Change AirPods Settings on Mac in macOS Ventura (A User Guide)
Sep 29, 2022
Last Updated on Sep 29, 2022
Apple Airpods is wireless earphone that connects to Bluetooth-compatible devices effortlessly. Let’s see all Customizable AirPods Settings on Mac.
Nowadays, the latest versions of AirPods come with various features to meet your hearing requirements. It includes cutting off the surrounding Sound using “Noise Cancellation” or selectively allowing ambient Sound using “Transparency mode.” Furthermore, it also has a feature of Personalized Spatial Audio which plays three-dimensional Sound.
If you are eager to know how AirPod settings on Mac in macOS Ventura work, you are on the right page. Here with this article, we have summarized all AirPod settings with some quick fixes for issues like AirPod connection error or AirPods sound muffled on Mac, etc.
MY LATEST VIDEOS
Apple inc Interesting Facts.mov
0 seconds of 2 minutes, 33 secondsVolume 0%


How to set up AirPods on Mac
- AirPods
- AirPods 2
- AirPods 3
- AirPods Pro
- AirPods Pro (2nd Generation – 2022)
Setting up AirPods on Mac is not tricky; you can do it in a minute. However, to set up AirPod on Mac, you need to connect your AirPods to your mac device for that following next topic.
How to Connect AirPods to Mac
You can quickly connect/pair your AirPods to mac venture with the following steps.
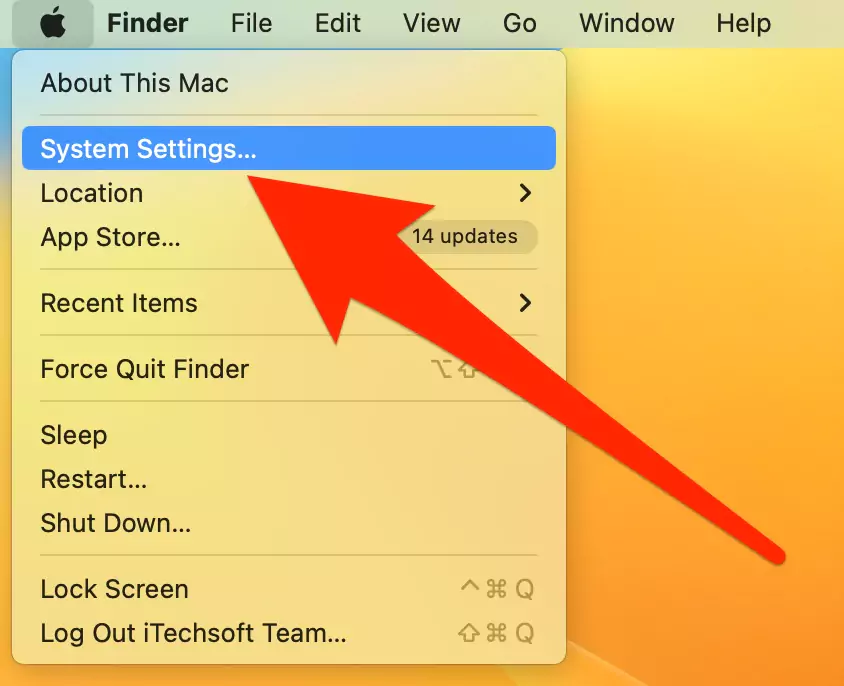
Step 1→ On your Mac, go to the Apple menu and select System settings.
Step 2→ Now turn on Bluetooth.
Step 3→ With the AirPods in the charging case, Open the lid of the charging case.
Step 4→ From the back of the charging case, press and hold the setup button until the indicator light flashes white. (On AirPods Pro Series), For AirPods Series, Button is on the front.
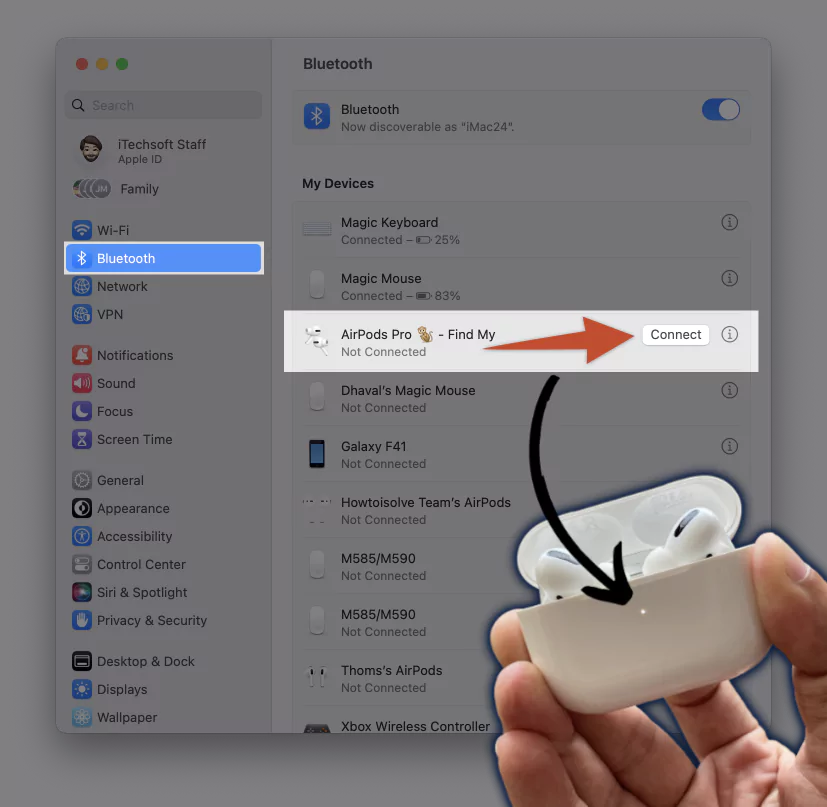
connect-airpods-to-mac
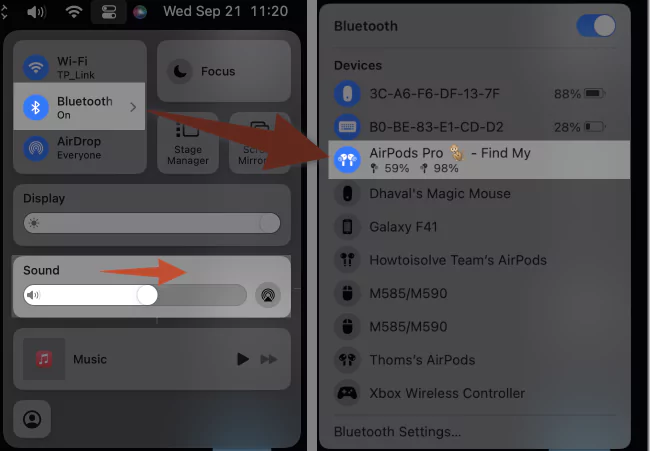
Step 5→ On your Mac, select your AirPods from “My Devices.” or “Nearby Device“.
Step 6→ Click Connect button next to the Airpod name or Right Click and Select Connect.
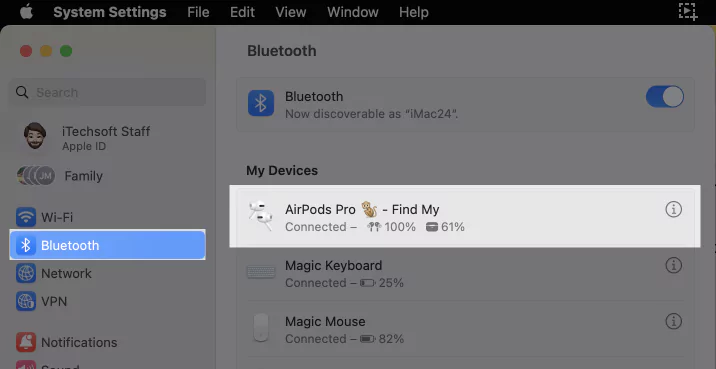
airpods-connected-to-mac
That’s it! Enjoy music hands freely with Airpods on. Once your airpods are connected, See all AirPods Settings on Mac under the Mac system settings.
How to Change AirPod Settings on Mac
We hope you have learned how to connect your AirPods to your Mac with the help of the above topic. What next? You must wonder how you can change AirPod settings like force sensor settings, Volume settings, Auto switch, and Auto-connect on your Mac. By going through the following few topics, you will be able to do it hassle-free.
How to Change AirPods Tap/Force Sensor Settings on Mac
For the Supported AirPods Model, we can Customize Force center settings, AirPods 3, AirPods Pro, and AirPods Pro 2nd Generation.
You can easily customize your AirPod Pro Force Sensor settings according to your convenience. You can customize what action to perform when you pinch the force sensor.
Check the below mention steps for how you can do it.
Step 1→ Make sure your AirPod is connected to the Mac device, Under the Bluetooth settings.
Or connect your AirPods first,
- → Go to Apple Menu and click System Settings.
- → Select Bluetooth > Click on Connect next to the AirPods name. or Showing under the Nearby Device.
- → Click on the info (i) icon next to your AirPod and Select AirPod Settings. (If it’s not showing then AirPods is not connected to Mac).
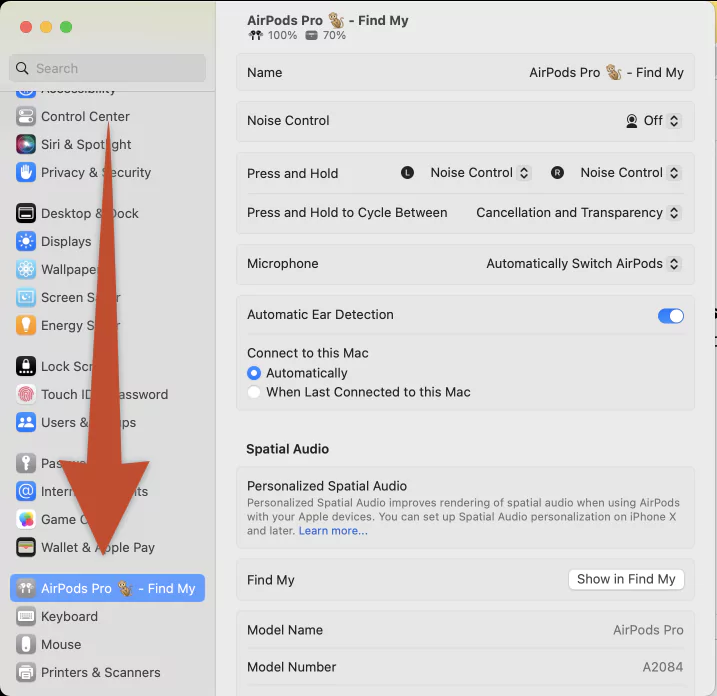
customize-airpods-settings-on-mac
Step 3→ Now, Under Press and Hold option, you can choose from “Noise control” or “Siri” for Left (Marked as L) and Right (Marked as R) AirPod Separately.
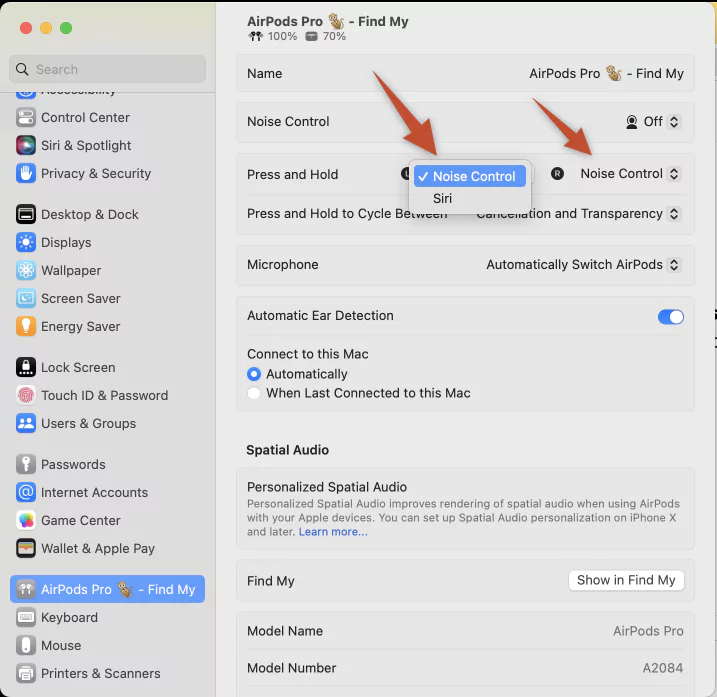
press-and-hold-airpods-settings-on-mac
Step 4→ Now, you can select Press and Hold Cycle between the following options.
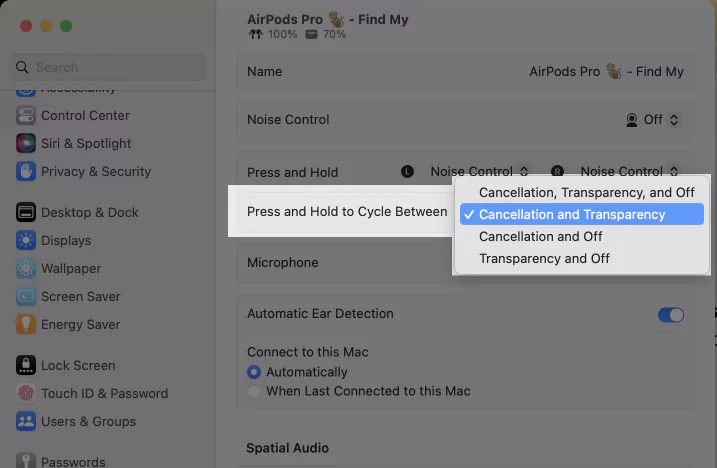
customize-cancellation-and-transparency-for-airpods-on-mac
- A) Cancellation, Transparency, and Off
- B) Cancellation and Transparency
- C) Cancellation and Off
- D) Transparency and Off
Here “Cancellation” will Cut off almost the surrounding Sound, whereas “Transparency” will allow ambient Sound. “Off” means you are just wearing an AirPods without any action.
How to change AirPods Microphone Settings on Mac
AirPods Allow users to Customize or Set the Default Microphone on AirPods, Either left airpod or Right Airpod. Under the Microphone option, Choose “Automatically Switch AirPods” or Set only for Left or Right AirPod from the dropdown option –
- Always Left AirPod
- Always Right AirPod
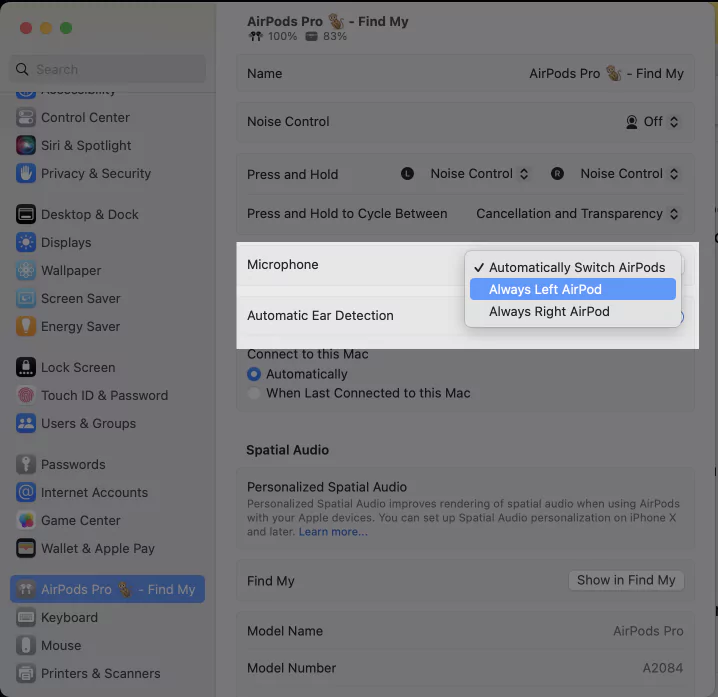
customize-microphone-settings-on-mac
That’s it. If AirPod Microphone is not working on Mac, then you should check and reset this setting from here.
How to adjust AirPod settings for Volume
You can easily change AirPod volume settings using mac settings, with Siri or without Siri.
Using Mac Settings
Following are the steps to adjust AirPod volume settings using MacOS Ventura.
Step 1→ Go to Apple Menu and click System Settings.
Step 2→ Select Sound from the left pan.

airpods-output-volume-settings-on-mac
Step 3→ Click on the Input tab and select the paired AirPod.
Step 4→ At the bottom, adjust the Volume by Moving the slider next to the Input Volume Option.
You can do the same for Output Volume, too; for that, in Step 3, you need to choose the Output tab > Output Volume.
Or (Easy Method)
First, ensure that your AirPod is connected to the Mac. Furthermore, go to the Control Center of your device and Move the Volume slider under Sound to increase or decrease Volume.
increase-airpods-volume-on-mac-using-control-center
With Siri
Press and hold the Force sensor and say, “Hey Siri Raise volume by 60%” to increase Volume with the Percentage of Volume.
To decrease Volume by a certain percentage, say, “Hey Siri, Lower volume by 60%,”
Without Siri
You can adjust Volume without Siri in AirPod Pro (2nd generation) by Swiping up or down the stem.
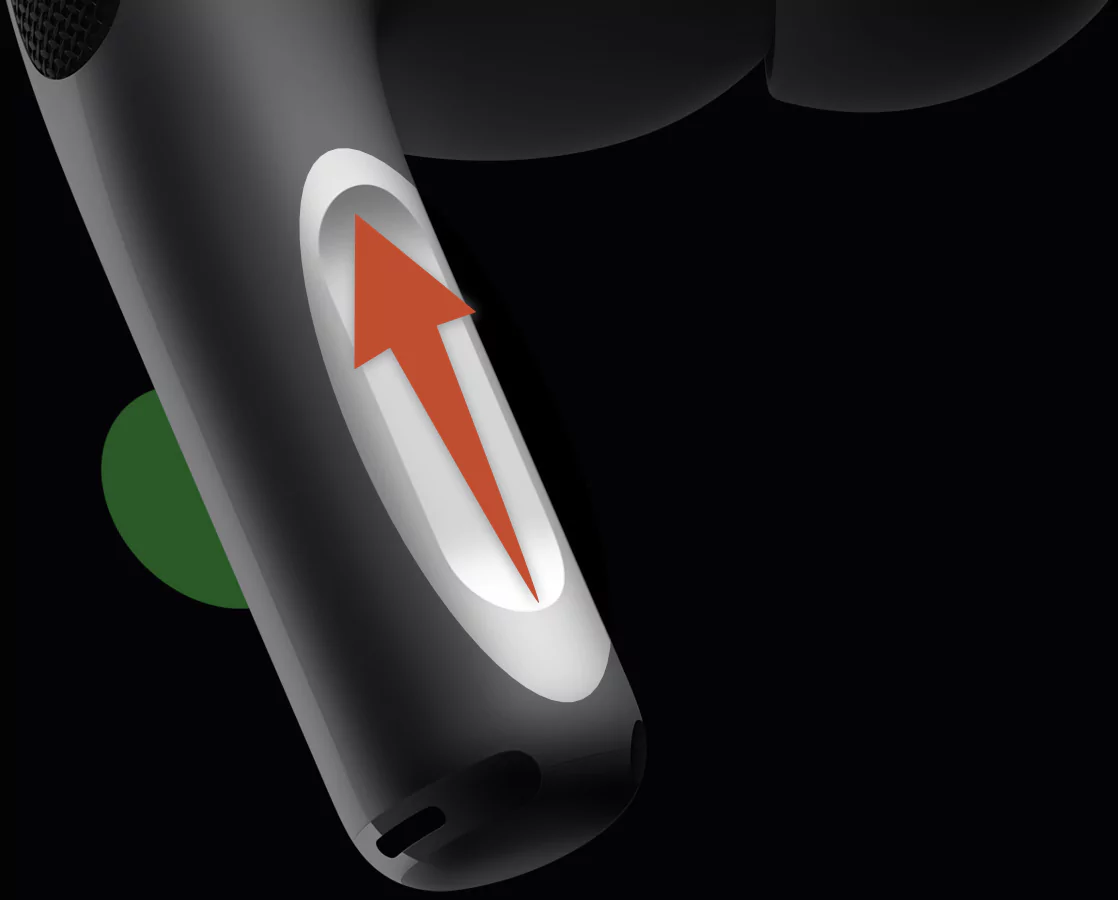
increase-airpods-volume-on-mac-without-siri
Get All AirPods Pro 2 Controls in the below Video Guide,
How to enable or Disable Connect to this Mac Automatically on Mac (Handoff)
Enabling or disabling connect to this Mac automatically on Mac (Handoff) is not a complex task; you can quickly do it with just a few steps. Here are the steps for that.
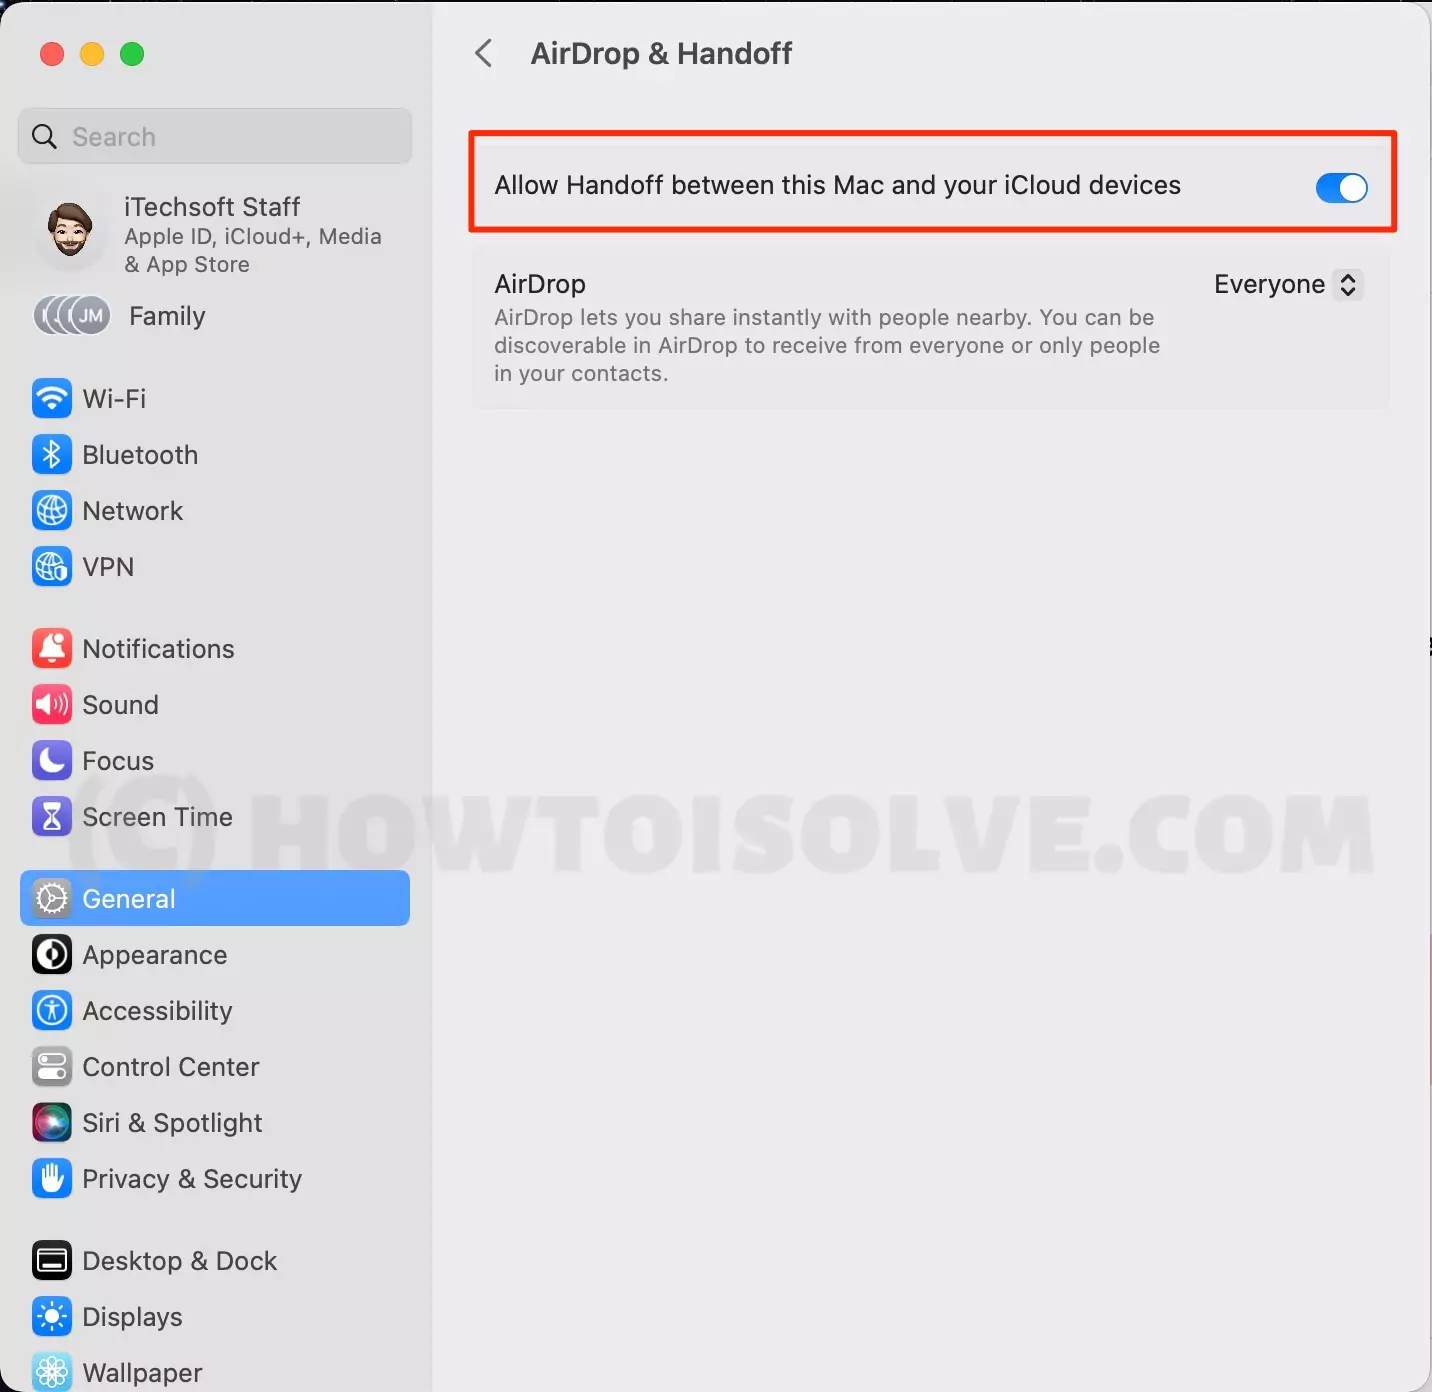
Step 1→ On your Mac, Go to Apple Logo and Select System Settings.
Step 2→ Now click on General.
Step 3→ Select AirDrop &Handoff.
Step 4→ At last, turn on the toggle next to “Allow Handoff between this mac and your cloud devices.“
allow-handoff-between-this-mac-and-your-icloud-devices-on-mac
With the help of the above steps, you will enable or disable connect to this Mac automatically on Mac (Handoff).
AirPods switch between iPhone and Mac
If you want to switch AirPod between iPhone and Mac, you must ensure that both devices are signed in with the same Apple ID. Let’s write the steps for manually switching AirPod from iPhone to Mac and vice versa.
Airpods Auto Switch
If you want your AirPods to switch automatically, not manually, then don’t worry; you can do it with the following instructions for each iPhone and Mac.
Turn on automatic switching on your Mac
Every time you don’t want to waste time manually switching AirPod, then with the below-mentioned steps, you can Turn on automatic switching on your Mac.
Step 1→ Put your AirPods into your ears and connect to your Mac
Step 2→ Go to Apple Menu and Select System Settings.
Related Readings
Step 3→ Next Select Bluetooth.
Step 3→ Click the Info button (i) next to your AirPods in the list of devices.
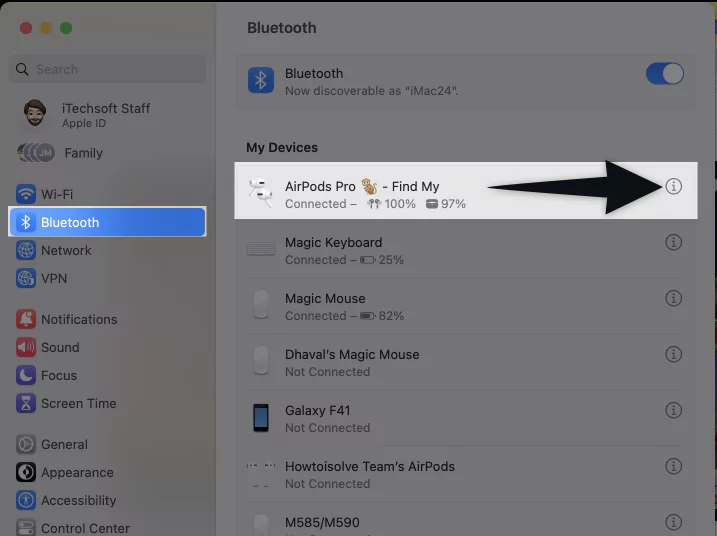
where-to-find-airpods-settings-on-mac
Step 4→ Under the option, connect to this Mac Select Automatically.

connect-airpods-automaticlly-to-this-mac
Now you can check that your AirPod gets automatically connected to your Mac.
Turn on automatic switching on your iPhone
Manually switching Airpods will take some time but automatically don’t. Hence follow the below steps to Turn on automatic switching on your iPhone.
Step 1→Put your AirPods into your ears and connect to your iPhone
Step 2→ Go to Settings > Tap on Bluetooth.
Step 3→ Tap the Info button (i) next to your AirPods in the list of devices.
Step 4→ Under the option, connect to this iPhone Select Automatically.
Now you can check that your AirPod gets automatically connected to your iPhone.
Manually Switch AirPod from iPhone to Mac
You can manually switch AirPod from iPhone to Mac using the following steps.
Step 1→ Ensure AirPods are in your ear.
Step 2→ Go to the “Control Center” Icon on your Mac, then click on Bluetooth.
Step 3→ Select your “AirPod” From the Bluetooth devices list.
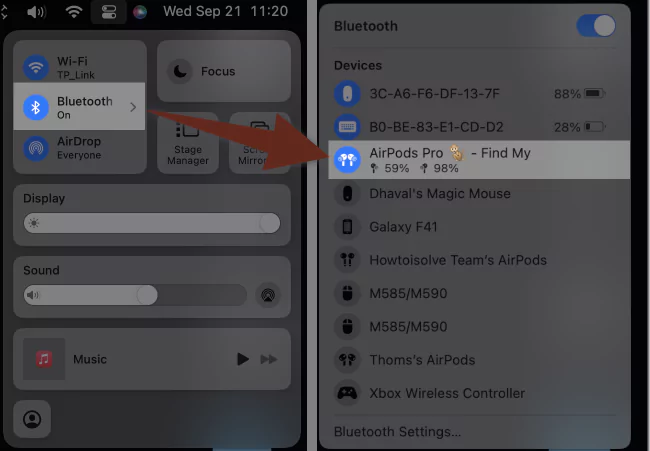
pair-airpods-to-mac-using-control-center
Then, manually Switch AirPod from Mac to iPhone.
You can easily connect AirPod back from Mac to iPhone by these steps.
- Tap “Control center” on iPhone > Tap on Bluetooth > next, Tap on Your AirPod from the list.
How to Turn on Spatial Audio on Mac (A Guide)
When you enable spatial audio on Mac, it will play 3D Sound. That sounds cool, right, but it comes with some limitations. Spatial audio is incompatible with some mac models, mac OS, or AirPods. For example, it is compatible with the macOS Monterey and macOS Ventura. Therefore, to enjoy spatial mode music, you first make sure that you use spatial audio compatible accessories, Applications, and services.
Get Detailed Spatial Audio
Follow this tutorial to know more details about spatial audio with AirPods on Mac.
Here are the steps to enable spatial mode on your Mac.
Step 1→ Go to Control Center > Sound > Select Spatialize Stereo.
Step 2→ Select Down Arrow to see the “Spatial Audio” Settings
Step 3→Choose from Off, Fixed, Head Tracked. Each option has a different meaning that is written below. Select Head Tracked to Turn on Spatial audio on AirPods.
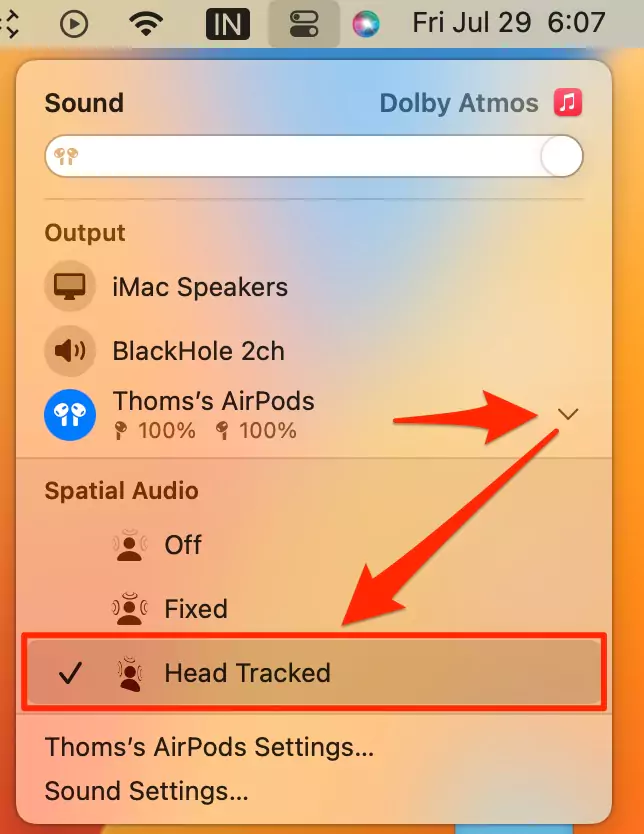
turn-on-spatial-audio-on-mac-control-center
Off – Disable Spatial audio.
Fixed – Audio will not change according to your head movement
Head Tracked– Audio will vary according to your head movement.
You are all done! To enjoy 3D Sound using spatial audio.
How to Turn on Head Tracked on Mac
For your Spatial Audio compatible mac models, we can enable this feature from the Mac system setting. Follow the below steps to start using Spatial Audio with Head Tracking on Mac.
Go to the Apple Logo from the top Menu > System Settings.
Next, Accessibility > Audio.

Under the General section > Enable “Spatial audio follows head movements” toggle.

And See the “Spatial Audio/Spatialize Stereo > Head Tracked” Option and use this feature for supported apps and media types.
That’s it.
How to Use Two Sets of AirPods on a Mac
Suppose you are wondering how you and your friend can enjoy Netflix series on Mac with two sets of AirPod. Well, don’t worry. With the help of the below-mentioned instruction, you and your friend simultaneously on your Mac can watch it.
Step 1→ Pair Both sets of AirPod to a Bluetooth of mac device.
Step 2→ Go to Finder and select Application.
Step 3→ Click on Utilities and then Open Audio MIDI Setup.
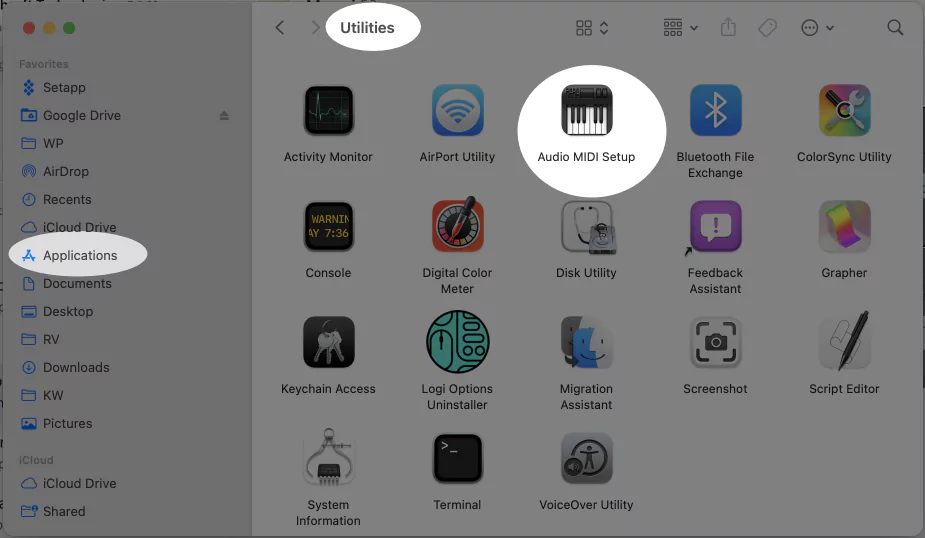
audio-midi-setup-on-mac
Step 4→ Select the ‘+’ symbol at the bottom and next click on Multi-Output Device.
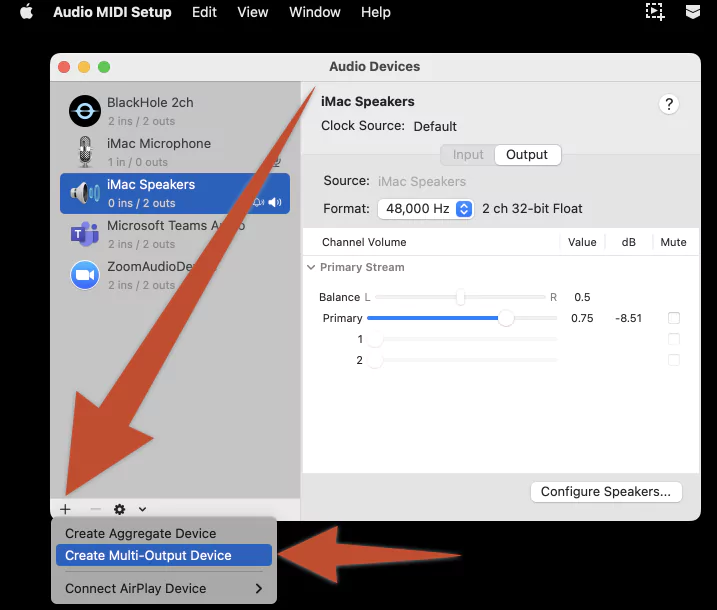
create-multi-output-device-under-audio-midi-setup-on-mac
Step 5→ Make sure both AirPods are connected under the Mac Bluetooth Preferences. Uncheck the default mac speaker and mark the check-in box next to the two sets of AirPods.
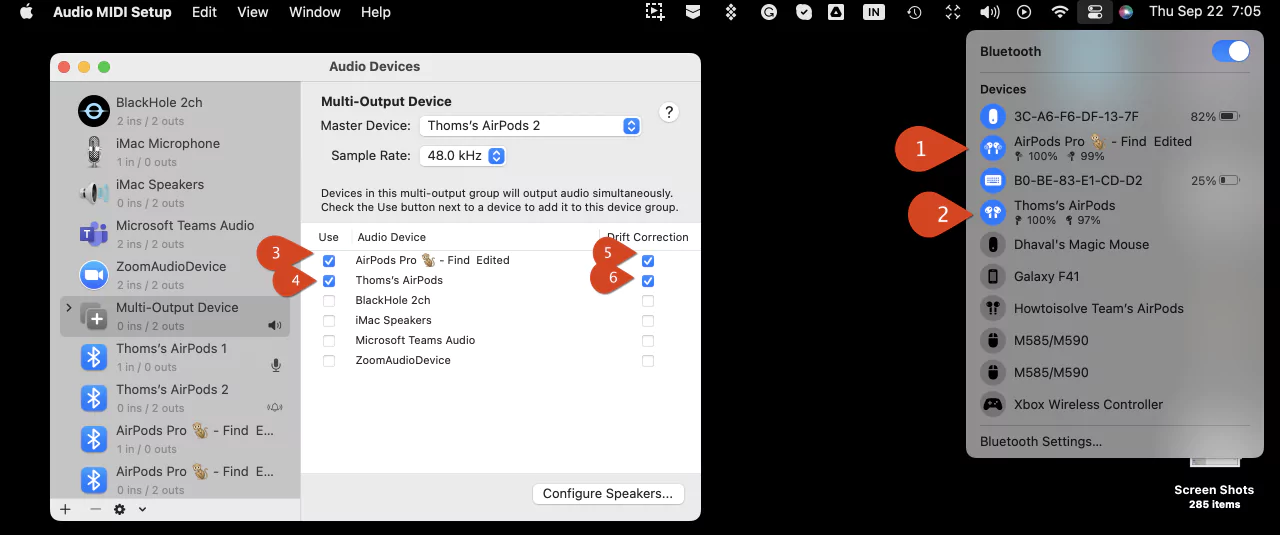
pair-both-airpods-to-mac-from-control-center-an-add-to-multi-output-device-on-mac
Also, you can set Master Device, One of Two AirPods. For Music control, Microphone and More from Audio MIDI Setup.
Step 6→ Mark Tick in the Drift Correction box next to the second/your friend’s pair of AirPods.
Step 7→ At last, Select the Apple menu > System Settings > Sound and select Multi-Output Device. Play music, and It’s not audible to Both Paired AirPods.
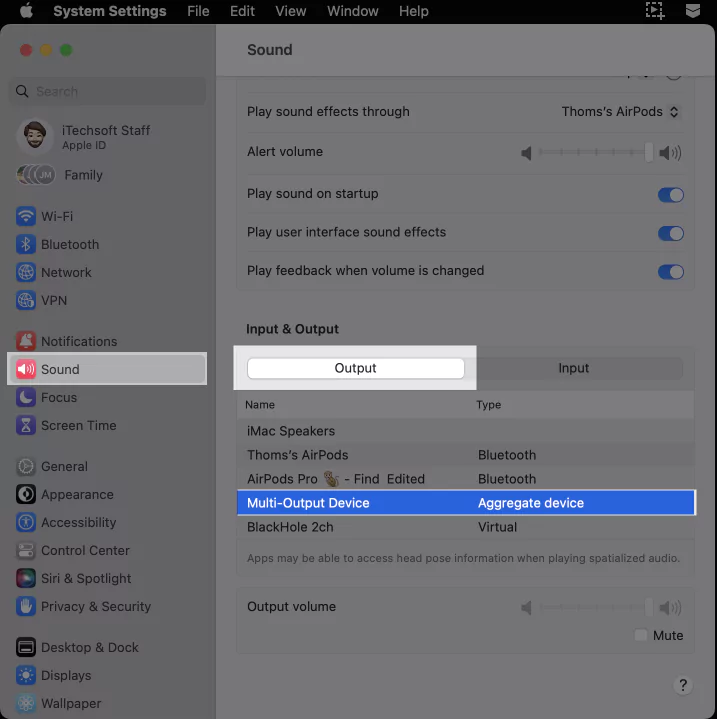
select-multi-output-device-on-mac
How to Rename AirPods name on Mac
You need to follow this instruction to rename your AirPod on your Mac.
Go to Apple Menu on Mac>Select System Settings >Click on Bluetooth > Select info (i) next to Airpod > Type New Name for AirPod next to Name Option.
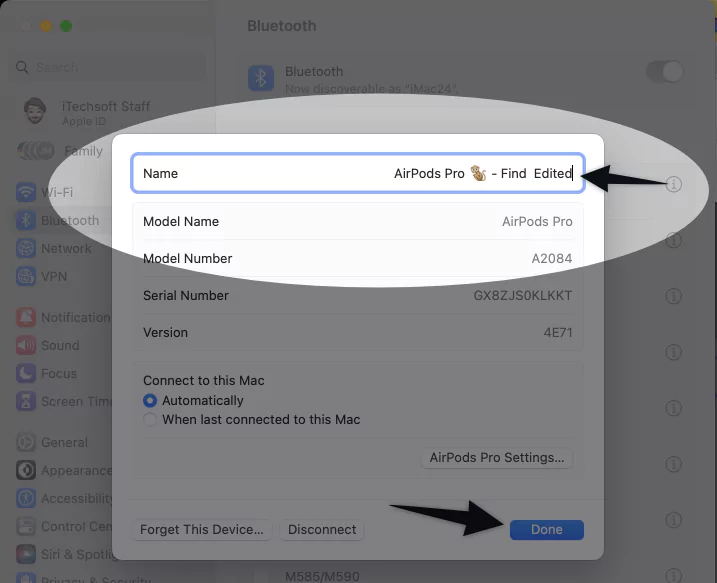
rename-airpods-name-on-mac
How to check AirPod battery on Mac
To check the AirPod battery on Mac, ensure that your AirPod is connected to Mac. Further, follow the below steps.
Go to Apple Menu on Mac > Select System Settings > Click on Bluetooth.
Now you can spot the Percentage of battery for both AirPod under your AirPod Name from the list of Bluetooth devices.
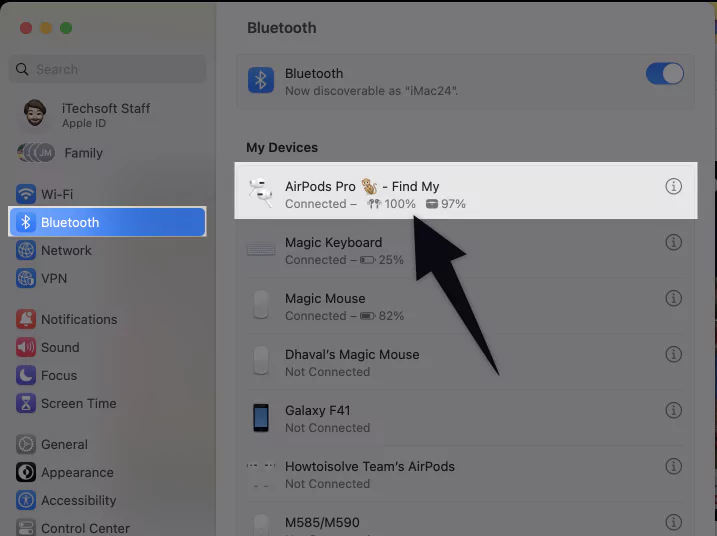
check-airpod-battery-on-mac
How to set up Find my AirPods on Mac
To set up Find My AirPod on Mac, first, you need to pair your AirPod with Mac. For pairing your AirPod to Mac, follow these steps.
Go to Apple Logo menu > Select System Settings > Click on Bluetooth > Under My Devices > Right click on AirPods > Choose Connect.
connect-airpods-to-mac
After pairing your AirPod with your Mac, go to the Pre-installed Find My app on your Mac. Now Select your Airpod under the list of Devices to find the location of your AirPod on the map.
Otherwise, Goto Apple Menu > Select System Settings > Scroll down till you find your AirPod > Click on your AirPod > Select Show In Find My > Select Devices tab > Choose your AirPod to find its location on the map.
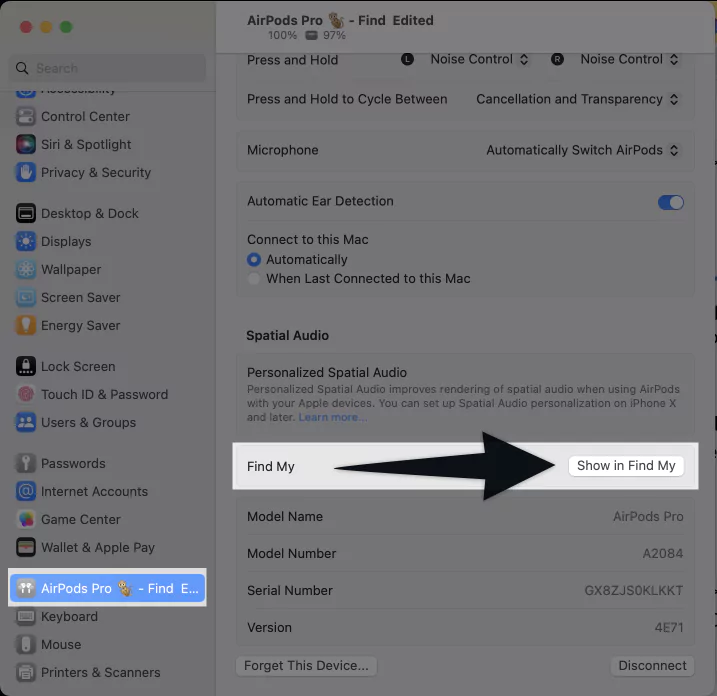
show-in-find-my-option-for-airpods-on-mac
Adjust Left & Right AirPods Volume on Mac
To adjust the Left and Right Volume on Mac, first Go to the Apple menu > System Settings >Select Sound > Select Output tab > Select your AirPod as an Output device.
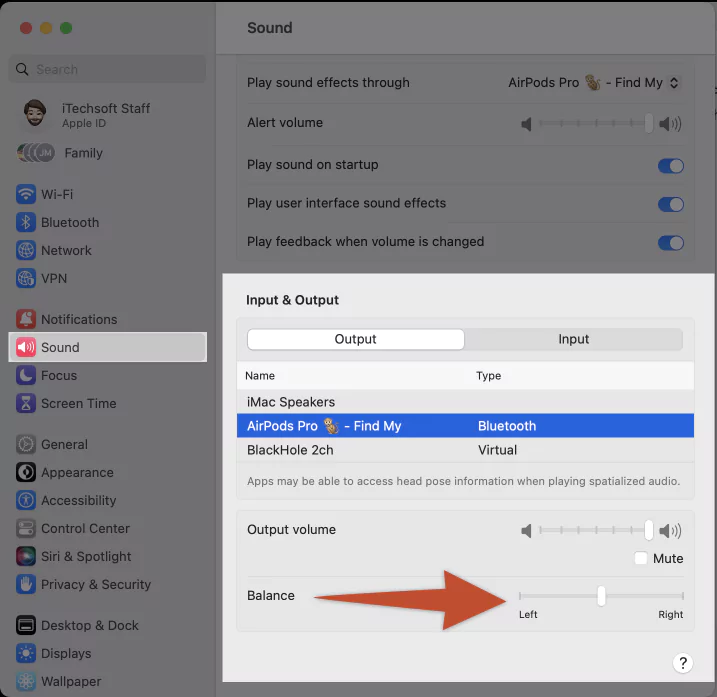
adjust-left-right-airpods-volume-on-mac
Next, you need to move the slider Next to Balance towards “L” for Adjusting the left AirPod Volume or Move the slider towards “R” For adjusting the Right AirPod Volume.
You can adjust AirPod Output volume on Mac using three different methods. Here is the full description of each method.
Adjust AirPods Output Volume on Mac
Method 1: Using Siri
This method is a fundamental and handy way to adjust the output volume on your device. For example, press and hold the Force sensor and say, “Hey Siri Raise volume by 60%” to increase Volume with the Percentage of Volume.
To decrease Volume by a certain percentage, say, “Hey Siri, Lower volume by 60%,”
Method 2: Using Control Center
First, ensure that your AirPod is connected to the Mac. Furthermore, go to the Control Center of your device and Move the Volume slider under Sound to increase or decrease Volume.
Method 3: Using System Settings
To adjust AirPod Output volume on Mac, first Go to the Apple menu > System Settings >Select Sound > Select Output tab > Select your AirPod as an Output device.
Next, you need to move the slider Next to Balance towards “L” for Adjusting the left AirPod Volume or Move the slider towards “R” For adjusting the Right AirPod Volume.
That’s it, and you are done! Enjoy music or movies undisturbed on Mac with your friend.
Left AirPods Not Working OR Right AirPods Not Working
Are you facing trouble that your one AirPod is not working correctly? Or AirPods sound muffled on Mac well; there can be multiple reasons for that.
Here is quick troubleshooting for Left AirPod/Right AirPod not working.
- The speaker of the Airpod may get clogged, so Clean your AirPod thoroughly.
- Check the battery of both AirPods.
- Turn Off and again Turn on Bluetooth.
- Unpair and again Pair AirPod.
- Check the Stereo sound. Apple Menu >System Settings > Sound>Output Volume > Select your AirPod >Move Balance Slider to the Center. Make sure that you have selected Paired AirPod.
- Ensure Paired AirPod is selected as an Output device.
- Update AirPod Firmware.
Troubleshooting
Get Solutions in detail: why is one of my airpods not working?
AirPods not connecting to Mac, or AirPods keep disconnecting from Mac.
Sometimes you may face issues like why won’t my AirPods connect to my Mac or why my AirPods keep disconnecting from Mac; there are various reasons for that.
Here are some reasons and fixes for AirPods not connecting or disconnecting from Mac; check it out and try to resolve your issue.
- Update your mac operating system.
- Restart Bluetooth on Mac.
- Make sure the Airpods and charging case battery are still alive.
- Ensure that Airpods and charging case is not damaged.
- Put both Airpod in the charging case and check whether it is charging correctly or not.
- Turn off Bluetooth on all other devices previously synced with the AirPods Reason is that Airpod may try to connect to other devices except Mac or switch between devices.
- Restart your mac device. Sometimes restarting Mac can resolve the Bluetooth pairing issue.
- The charging case lid must be open when you press and hold the power button during initial pairing.
- Remove/Unpair your Airpod from the My Devices list and Pair it again. Then try to set up a new connection using connect. To remove Airpod, follow this step. Go to Apple menu > Select System Settings > Click on Bluetooth > Under My Devices >Right click on AirPods > Choose Forget.
- Check the Output device and make sure it must be your AirPods.
- Try Resetting your Apple Airpods.
- Debug macs Bluetooth module.
- Reboot your mac device.
Get detailed Solutions for why won’t my airpods connect to my mac.
I hope you can fix your issue regarding the Connection failed AirPods mac with the help of above mentions reasons with some quick fixes.
AirPods Pro 2 vs AirPods 3 Settings on Mac
AirPods Pro 2 vs AirPods 3


We will be happy to hear your thoughts
Leave a reply
No widgets added

Important
- Send Tips? Mail Us [Write For HowToiSolve]: Right Chance to get Rewards in Forum.
- Apps & Accessories Reviews: Submit us
- Have you any problems with Your Apple Devices? Submit Your Problems [Get Free Troubleshooting Tips]
- HIS Disclaimers...As an Amazon Associate, I earn from Qualifying Purchases. Howtoisolve is not subordinate or connected with Apple Inc.
copyright (C) 2023 - [Sitemap] All Rights Reserved. Reproduction without explicit permission is prohibited.